Home Assistant remote access with CloudFlare Tunnel
Cloudflare Tunnel
Cloudflare Tunnel provides you with a secure way to connect your resources to Cloudflare without a publicly routable IP address. With Tunnel, you do not send traffic to an external IP — instead, a lightweight daemon in your infrastructure (cloudflared) creates outbound-only connections to Cloudflare’s edge. Cloudflare Tunnel can connect HTTP web servers, SSH servers, remote desktops, and other protocols safely to Cloudflare. This way, your origins can serve traffic through Cloudflare without being vulnerable to attacks that bypass Cloudflare.
How it works
Cloudflared establishes outbound connections (tunnels) between your resources and the Cloudflare edge. Tunnels are persistent objects that route traffic to DNS records. Within the same tunnel, you can run as many cloudflared processes (connectors) as needed. These processes will establish connections to the Cloudflare edge and send traffic to the nearest Cloudflare data center.

Home Assistant Add-on: Cloudflared
Publishing Home Assistant directly on the internet is not without any risk. This technical note helps with the configuration and several security measures, but use this configuration or the Cloudflare Tunnel at your own risk. Using https://www.nabucasa.com/ or Home Assistant cloud is recommended.
Cloudflared connects your Home Assistant instance via a secure tunnel to a domain or subdomain at Cloudflare. It exposes your Home Assistant to the Internet without opening ports on your router. Additionally, you can utilize Cloudflare Teams, their Zero Trust platform, to further secure your Home Assistant connection.
To use this add-on, you have to own a domain name (e.g. example.com) and use the DNS servers of Cloudflare. If you do not have one, you can get one for free at Freenom.
Please make sure to be compliant with the Cloudflare Self-Serve Subscription Agreement when using this add-on. Especially section 2.8 could be breached when mainly streaming videos or other non-HTML content.
Read the full add-on documentation
Installation
Prerequisites
- Make sure to remove all other add-ons or configuration entries handling SSL certificates. That means if you already have the DuckDNS add-on, Let’s Encrypt add-on, or something similar, or you have manually configured some SSL certificates in your Home Assistant, you have to remove them.
- You have to have a working Cloudflare setup with a domain name, and we already have that, so we are good to go.
- And the last prerequisite is to decide whether to use a local or managed tunnel (We are going to use a local one)
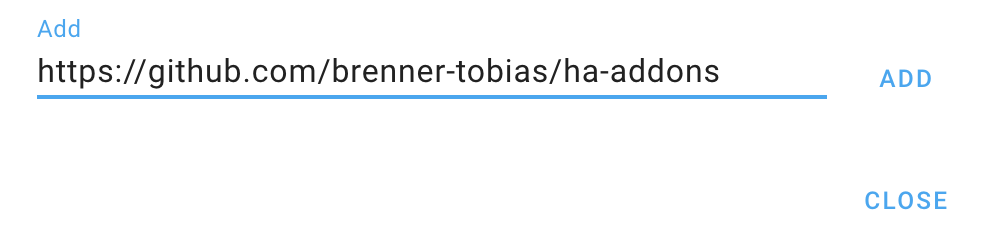
To install this add-on, manually add the HA-Addons repository link https://github.com/brenner-tobias/ha-addons to Home Assistant.
Go to Settings, Add-ons, and Add-on Store.
Select repositories from the upper right menu.
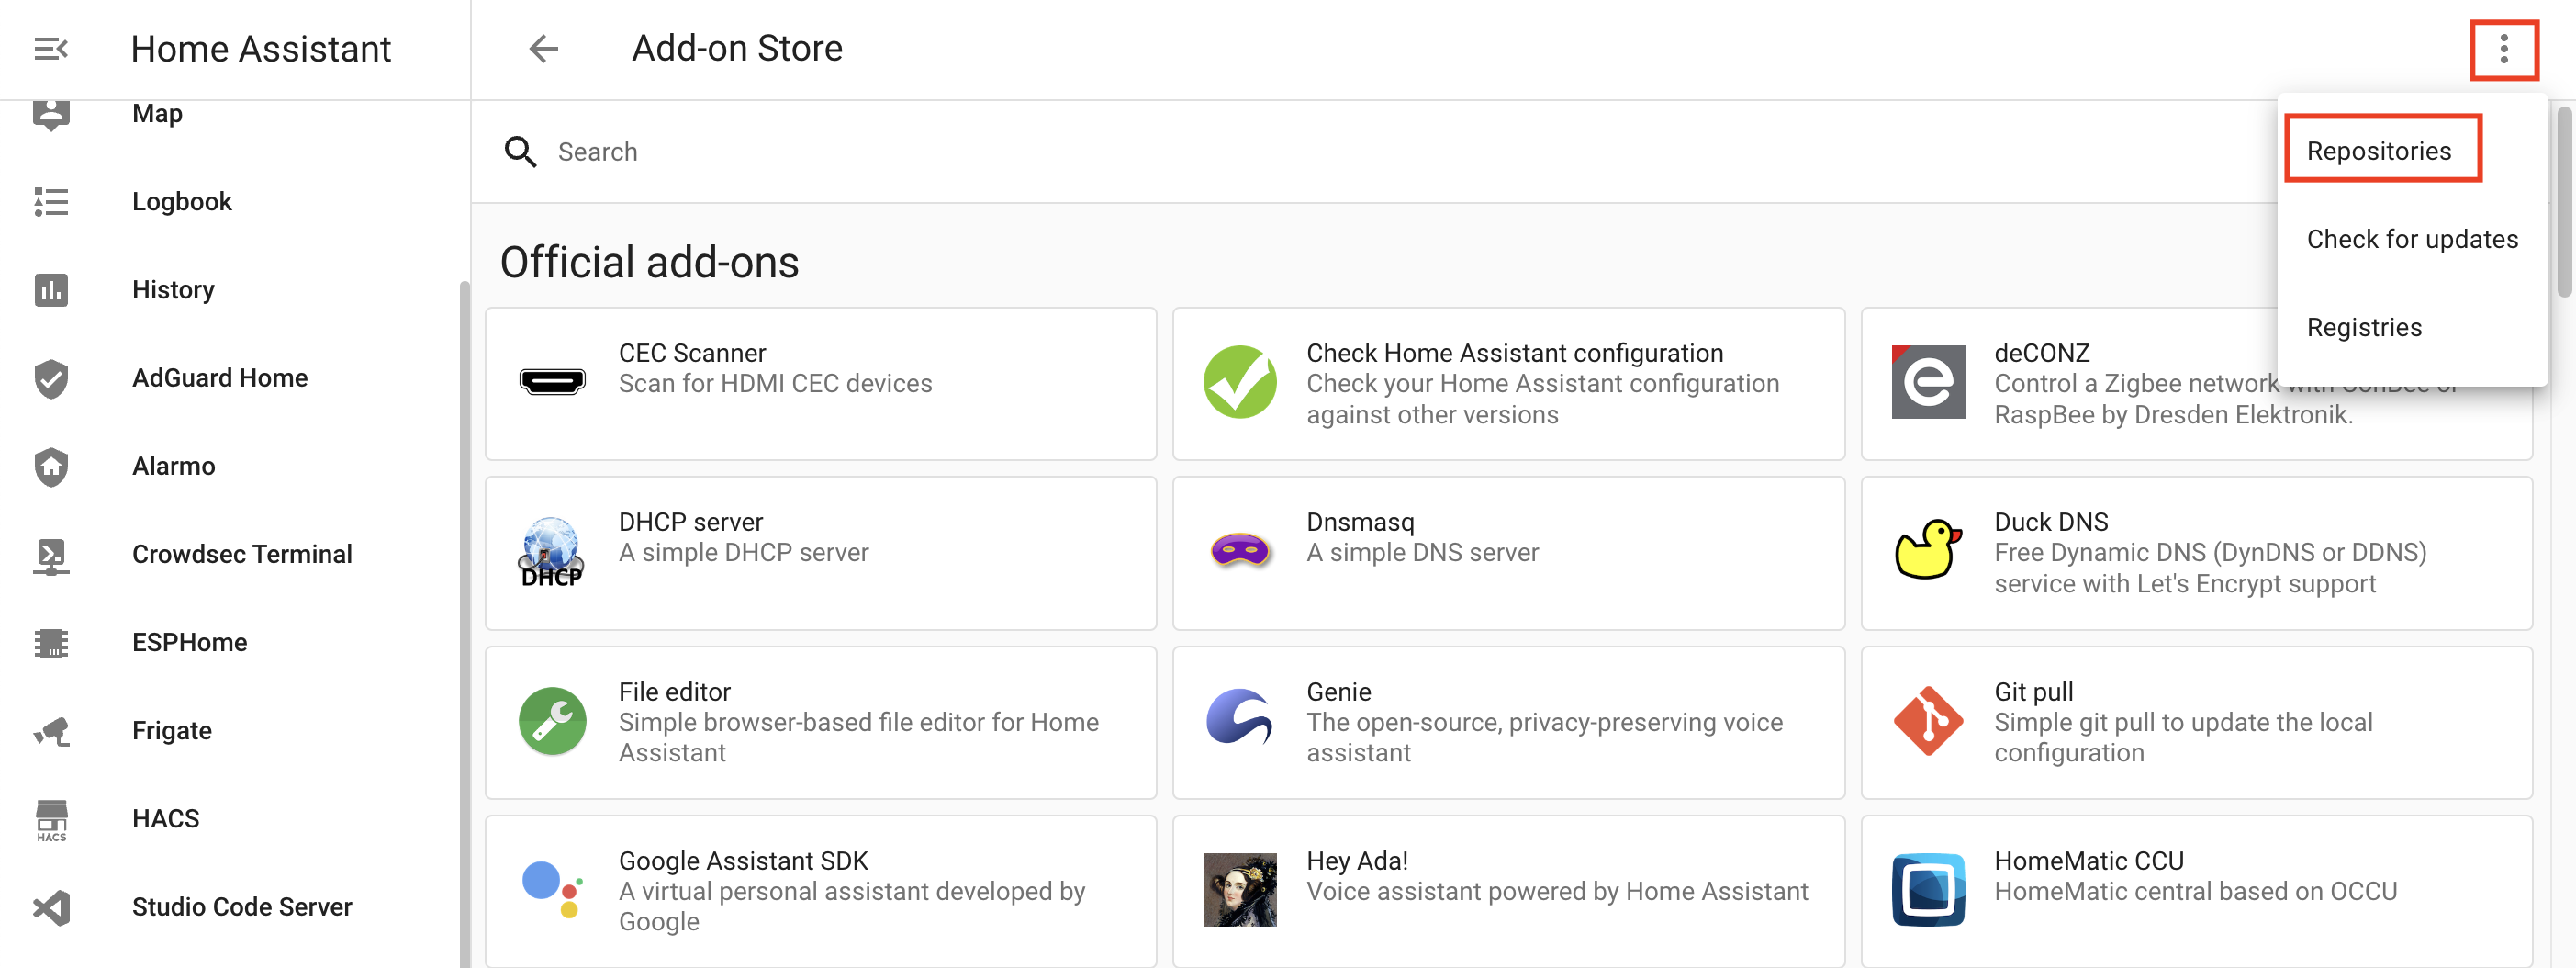
Add https://github.com/brenner-tobias/ha-addons
Select the Cloudflared addon from the list and click install.
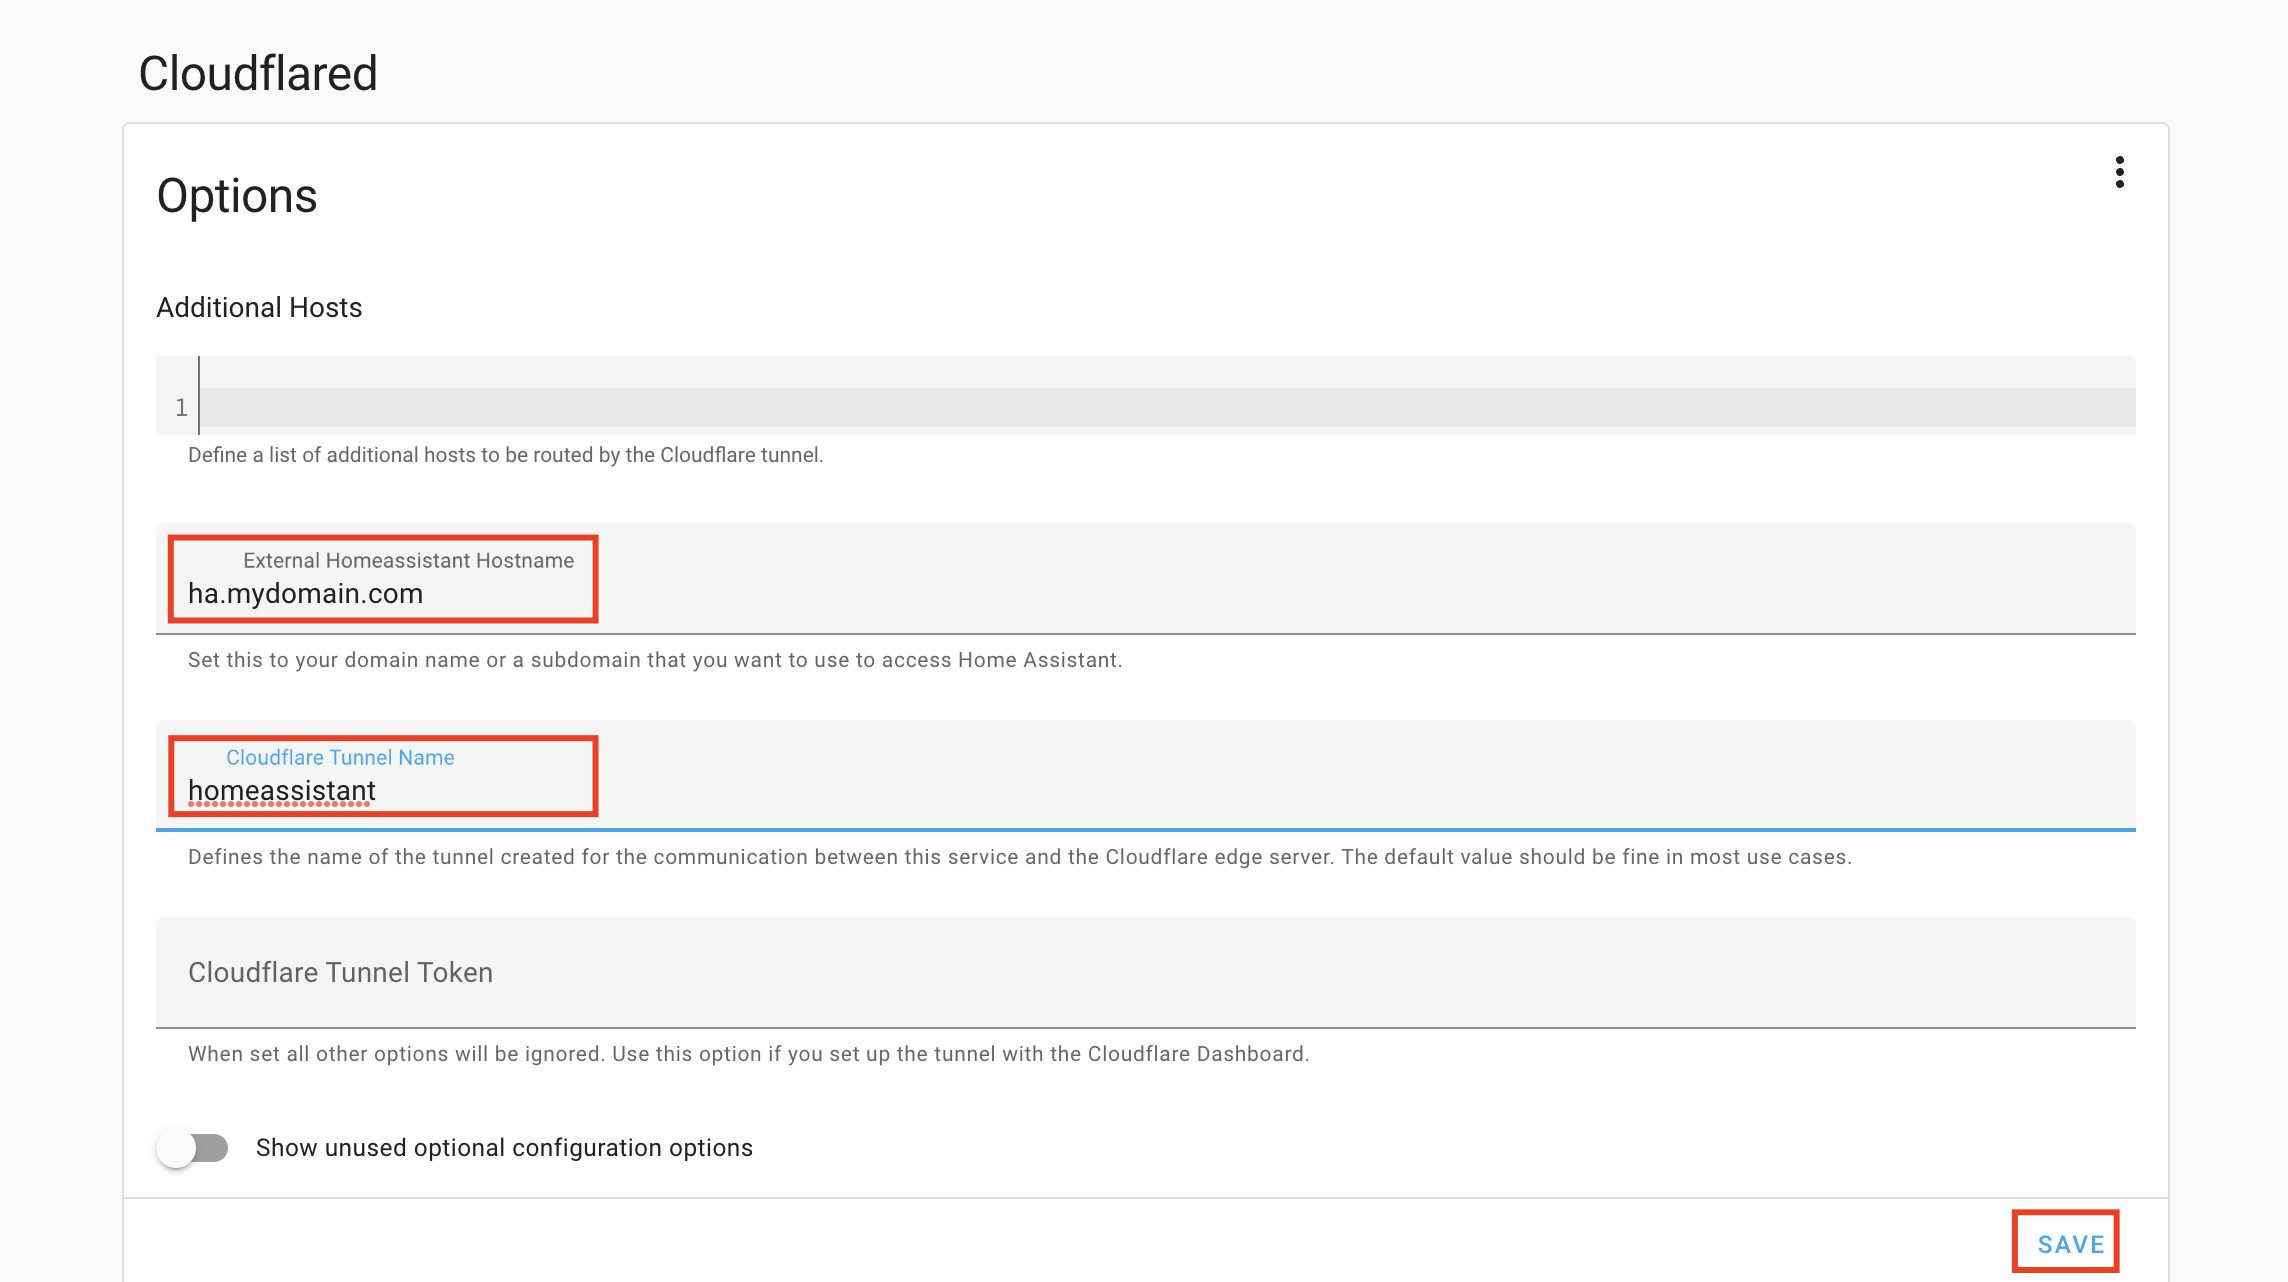
Go to the add-on configuration and provide you external hostname and Cloudflare tunnel name.
- Enable IP banning and the x-forwarded-fore header use in Home Assistant.
This will enable IP banning after 5 failed logging attempts and the processing of the original web client IP address via the x-forwarded-for header in Home Assistant.
Paste the following lines inside the configuration.yaml and save.
1
2
3
4
5
6
http:
  ip_ban_enabled: true
  login_attempts_threshold: 5
  use_x_forwarded_for: true
  trusted_proxies:
    - 172.30.33.0/24
Restart Home Assistant.
- Do not start the add-on yet.
Securing Access to the Cloudflare Account
The add-on downloads, after authentication, a cert.pem file to authenticate your instance of Cloudflare against your Cloudflare account. You can not revoke access to this file from your cloudflare account! https://github.com/cloudflare/cloudflared/issues/93
Work Around
- Create a new (secondary) Cloudflare account and invite it to yourCloudflare (primary) account that manages your domain (https://dash.cloudflare.com/sign-up)
- Cloudflare Dashboard-> Manage Account-> Members-> Invite Member
- Instead of using your primary account to authenticate the tunnel, use your secondary account.
If your cert.pem file is compromised, you can revoke your secondary account from your primary account.
Connection
Start the Cloudflared add-on

- Check the logs of the “Cloudflare” add-on. You need to copy a URL from the logs and visit it to authenticate.
Make sure to use the secondary account for authentication and select the primary account for tunnel creation and validation!
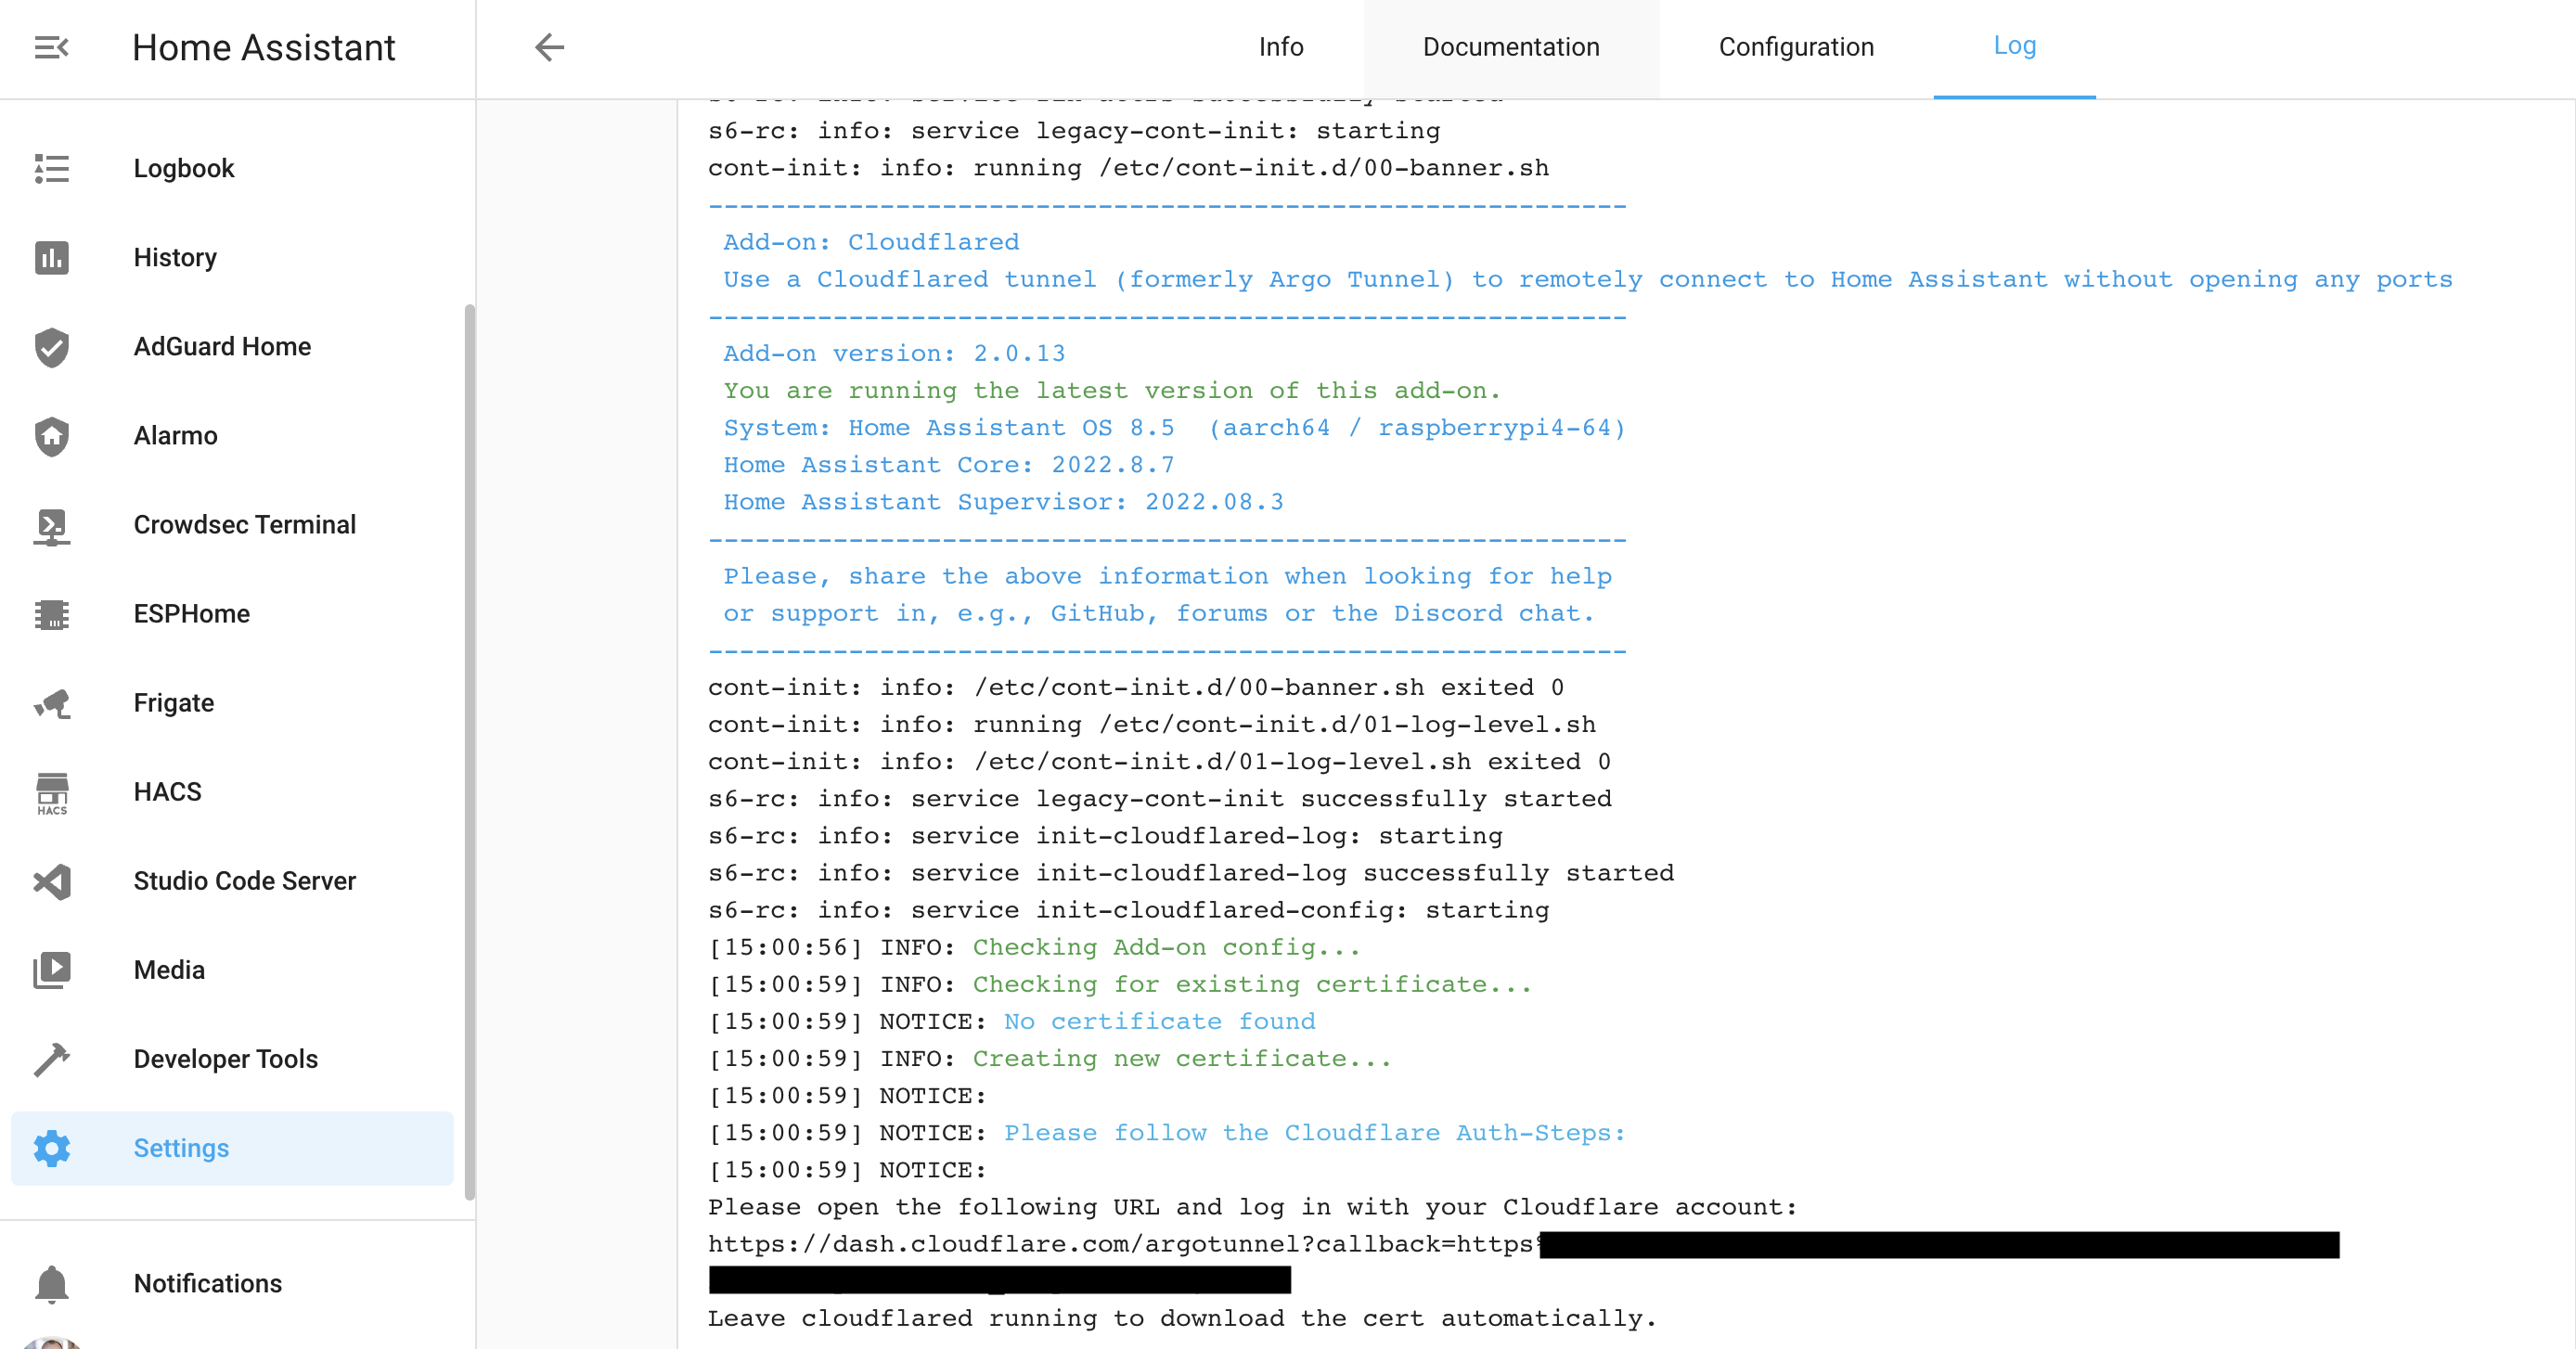
- Check the add-on logs for
1
2
3
4
5
6
7
8
9
10
[15:11:13] INFO: Finished setting-up the Cloudflare tunnel
s6-rc: info: service init-cloudflared-config successfully started
s6-rc: info: service cloudflared: starting
s6-rc: info: service cloudflared successfully started
s6-rc: info: service healthcheck: starting
s6-rc: info: service healthcheck successfully started
s6-rc: info: service legacy-services: starting
s6-rc: info: service legacy-services successfully started
[15:11:13] INFO: Starting Cloudflared Healthcheck for Home-Assistant add-on.
[15:11:14] INFO: Connecting Cloudflared Tunnel..
Additional Security
Cloudflare
By using Cloudflare (as a proxy), we can add additional security to the connection.
Only allow traffic on HTTP and HTTPS on the Cloudflare edge for Home Assistant
The connection itself, other ports 80 and 443, will not work, but it is better to block all other ports on the CloudFlare edge.
- Open the Cloudflare dashboard and go to your website e.g. domain and select Security and then WAF in the left pane.
- Create a firewall rule with the following expression (edit expression or use the expression builder if you prefer that).
1
http.host eq "ha.yourdomain.com" and not cf.edge.server_port in {80 443} - Choose action Block and deploy firewall rule
Only allow traffic from specific countries (for me, Belgium and the Netherlands is sufficient).
This will also prevent global scanning and reconnaissance and list your home assistant url
- Open the Cloudflare dashboard and go to your website, e.g. domain, and select Security and then WAF in the left pane
- Create a firewall rule with the following expression (edit expression or use the expression builder if you prefer that)
1
(http.host in {"ha.yourdomain.com"} and not ip.geoip.country in {"NL" "BE"}) - Choose action Block and deploy firewall rule
Deny access from the internet to the Home Assistant /local URI
Files served from the www/local folder, aren’t protected by the Home Assistant authentication. Files stored in this folder, if the URL is known, can be accessed by anybody without authentication. https://github.com/home-assistant/core/issues/31821
- Open the Cloudflare dashboard and go to your website, e.g. domain, and select Security and then WAF in the left pane
- Create a firewall rule with the following expression (edit expression or use the expression builder if you prefer that).
1
(http.host in {"ha.yourdomain.com"} and http.request.uri.path eq "/local") - Choose action Block and deploy firewall rule
Redirect all HTTP to HTTPS and minimum TLS version
- Open the Cloudflare dashboard and go to your website, e.g. domain, select SSL/TLS and then Egd e Certificates in the left pane
- Enable Always Use HTTPS
- Select TLS1.2 as the Minimal TLS version.
Bot Fight Mode
- Open the Cloudflare dashboard and go to your website e.g. domain and select Security and then Bots in the left pane
- Enable Bot Fight Mode
this could break something as it injects javascript to match patterns of known bots. For me, everything is working fine.
- Enable Bot Fight Mode
Do not forget to secure your primary and secondary Cloudflare accounts with Multi-Factor authentication
Home Assistant
Secure your Home Assistant login with multi-factor authentication.
https://www.home-assistant.io/docs/authentication/multi-factor-auth/
By default, the totp module named authenticator app will be autoloaded.
You can turn MFA on and off on the profile page for your user account.
IP banning (and x-forwarded-for)
Previously enabled -> Home Assistant Add-on: Cloudflare -> Installation -> Step 6
Home Assistant notifications
Home Assistant provides notifications in the app in the notification center. I prefer to also have a notification on my mobile when there is a failed logon or an IP is banned.
Failed logon notification
1
2
3
4
5
6
7
8
9
10
11
12
13
alias: Send notification upon failed login attempt
trigger:
  - platform: state
    entity_id: persistent_notification.http_login
condition:
  - condition: template
    value_template: ""
action:
  - service: notify.mobile_app
    data_template:
      title: ""
      message: >-
        url: https://whatismyipaddress.com/ip/
IP Ban notification
1
2
3
4
5
6
7
8
9
10
11
12
13
14
15
alias: Send notification upon banned IP
description: ""
trigger:
  - platform: state
    entity_id:
      - persistent_notification.ip_ban
condition:
  - condition: template
    value_template: ""
action:
  - service: notify.mobile_app
    data_template:
      title: ""
      message: ""
mode: single
Validation
Connection, logon, and Multi-Factor authentication
Open a new browser tab and connect to your external hostname; for example, https://ha.mydomain.com.
Only allow traffic from specific countries.
- Change the Cloudflare Firewall rule to DE as a country for validation and save
1
(http.host in {"ha.yourdomain.com"} and not ip.geoip.country in {"NL" "DE"})
Open a new browser tab and connect to your external hostname; for example, https://ha.mydomain.com.
You should receive Access Denied.
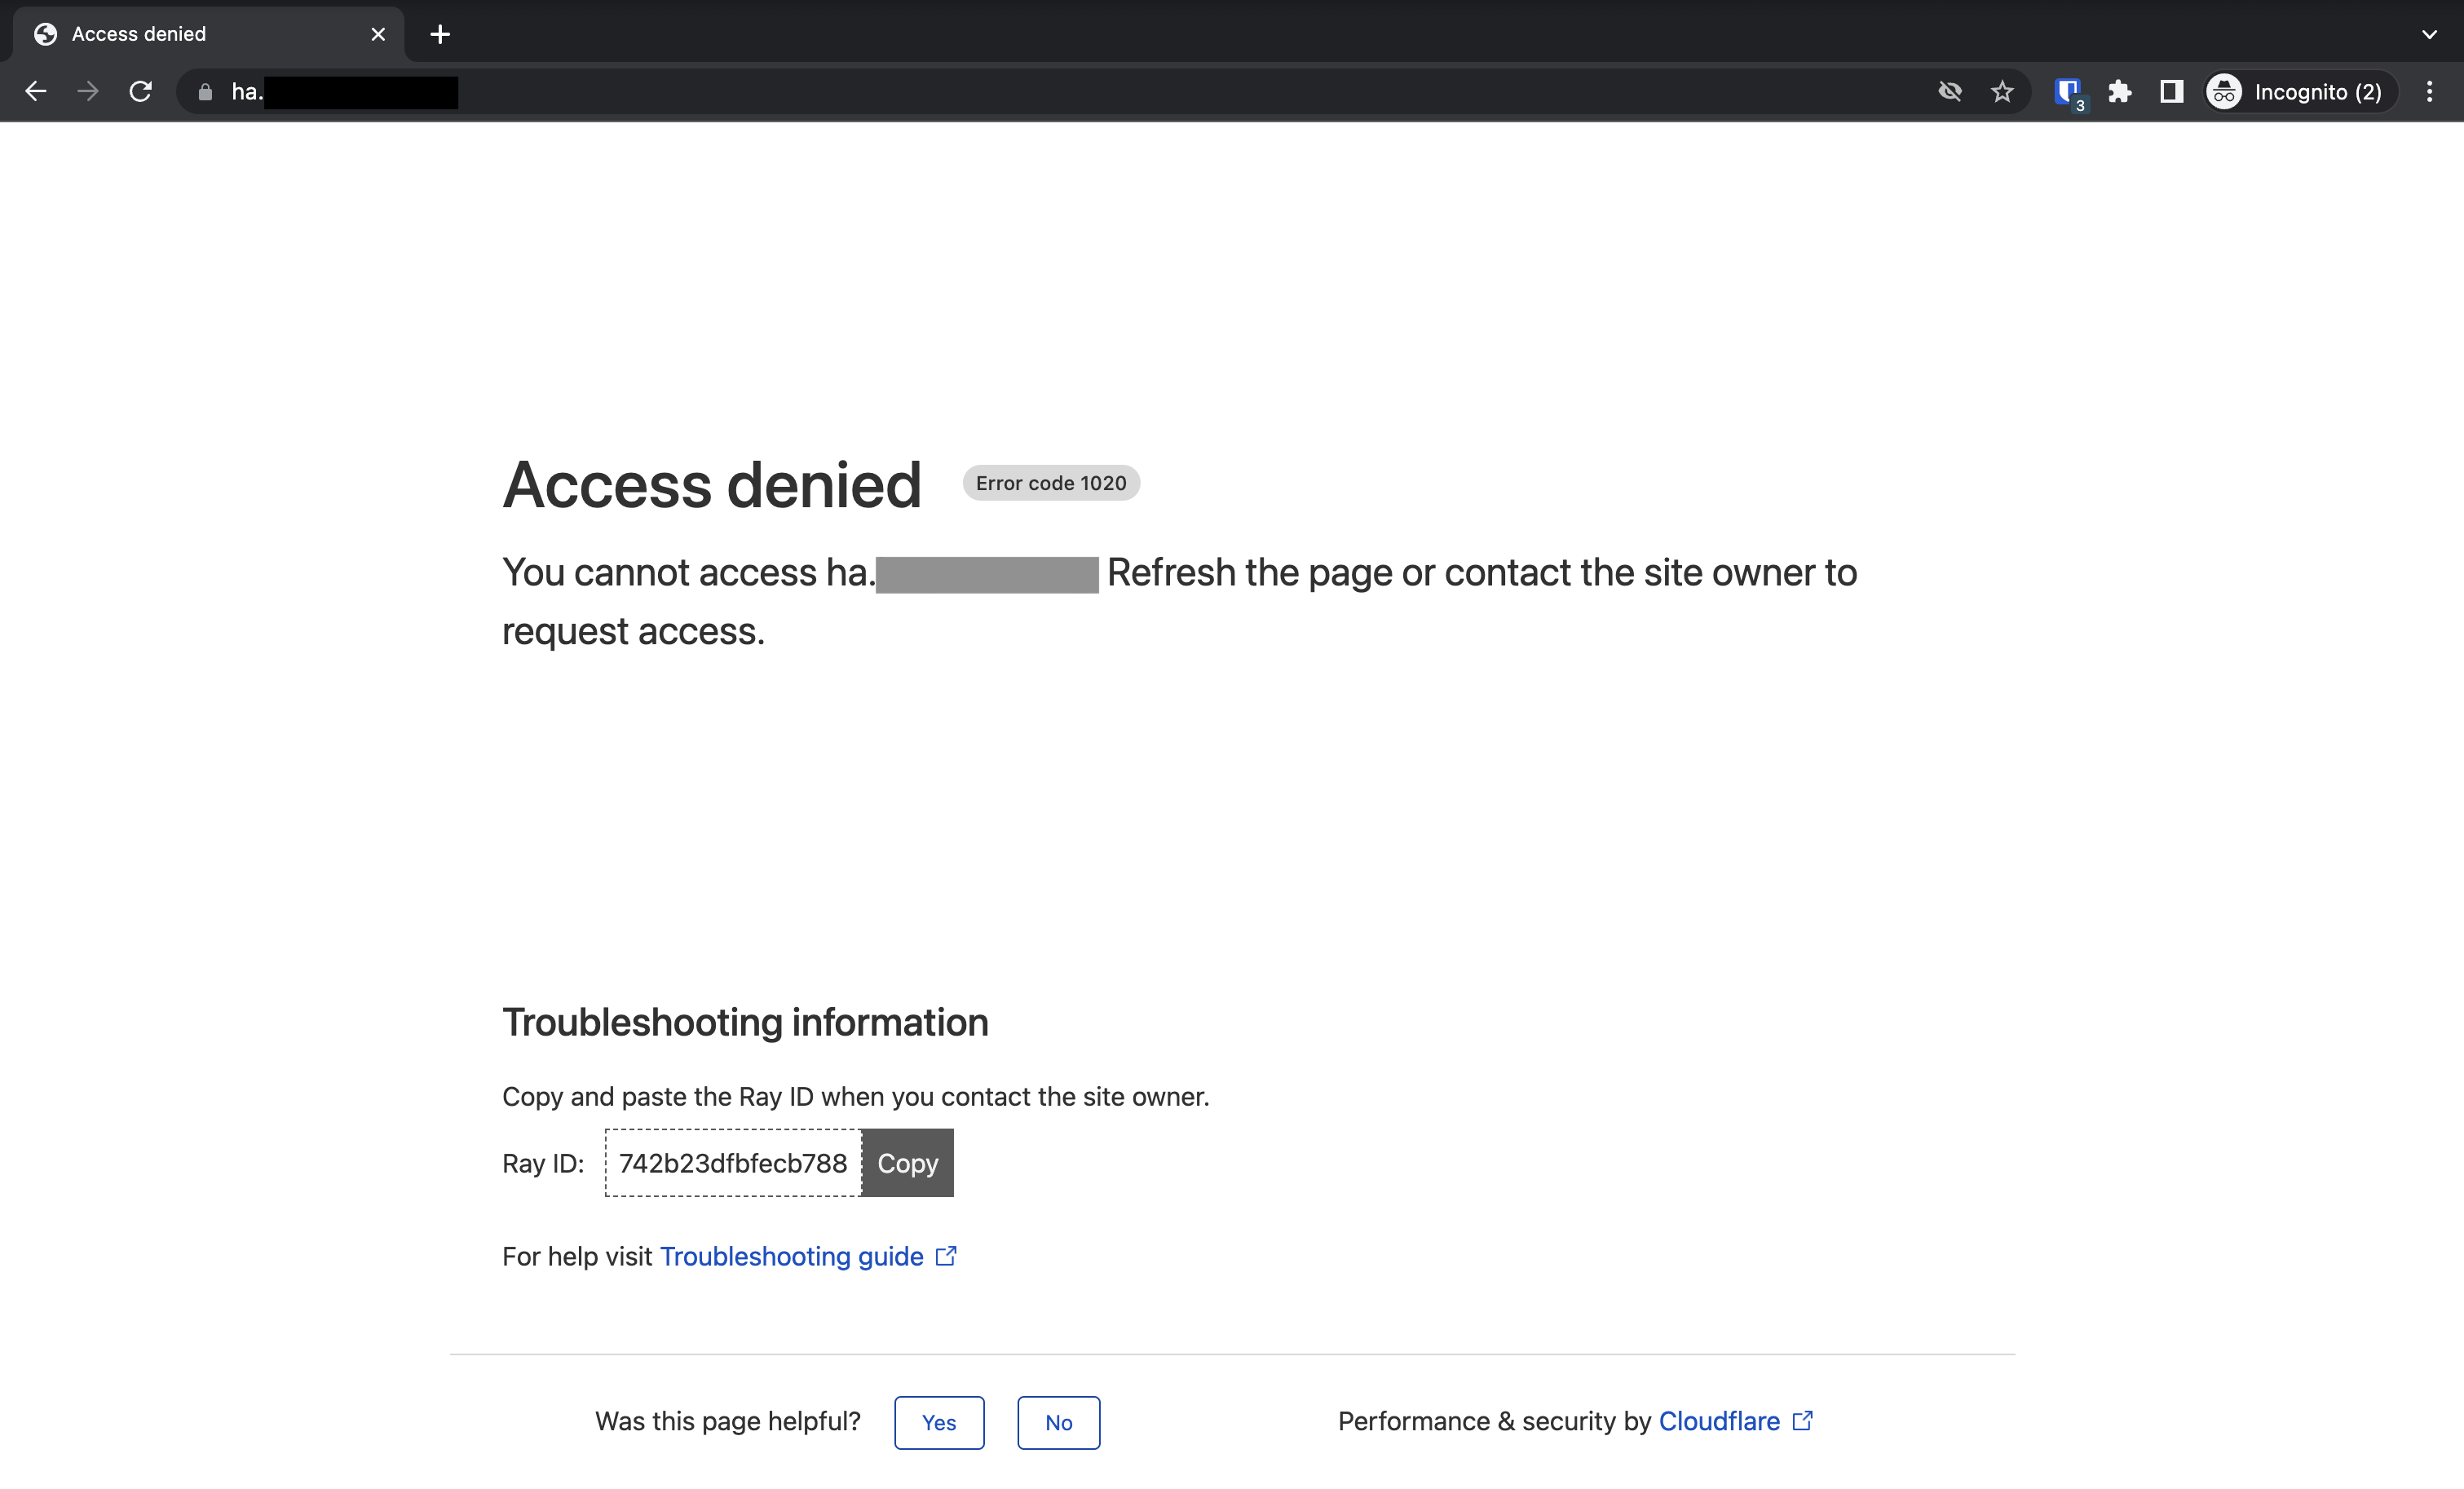
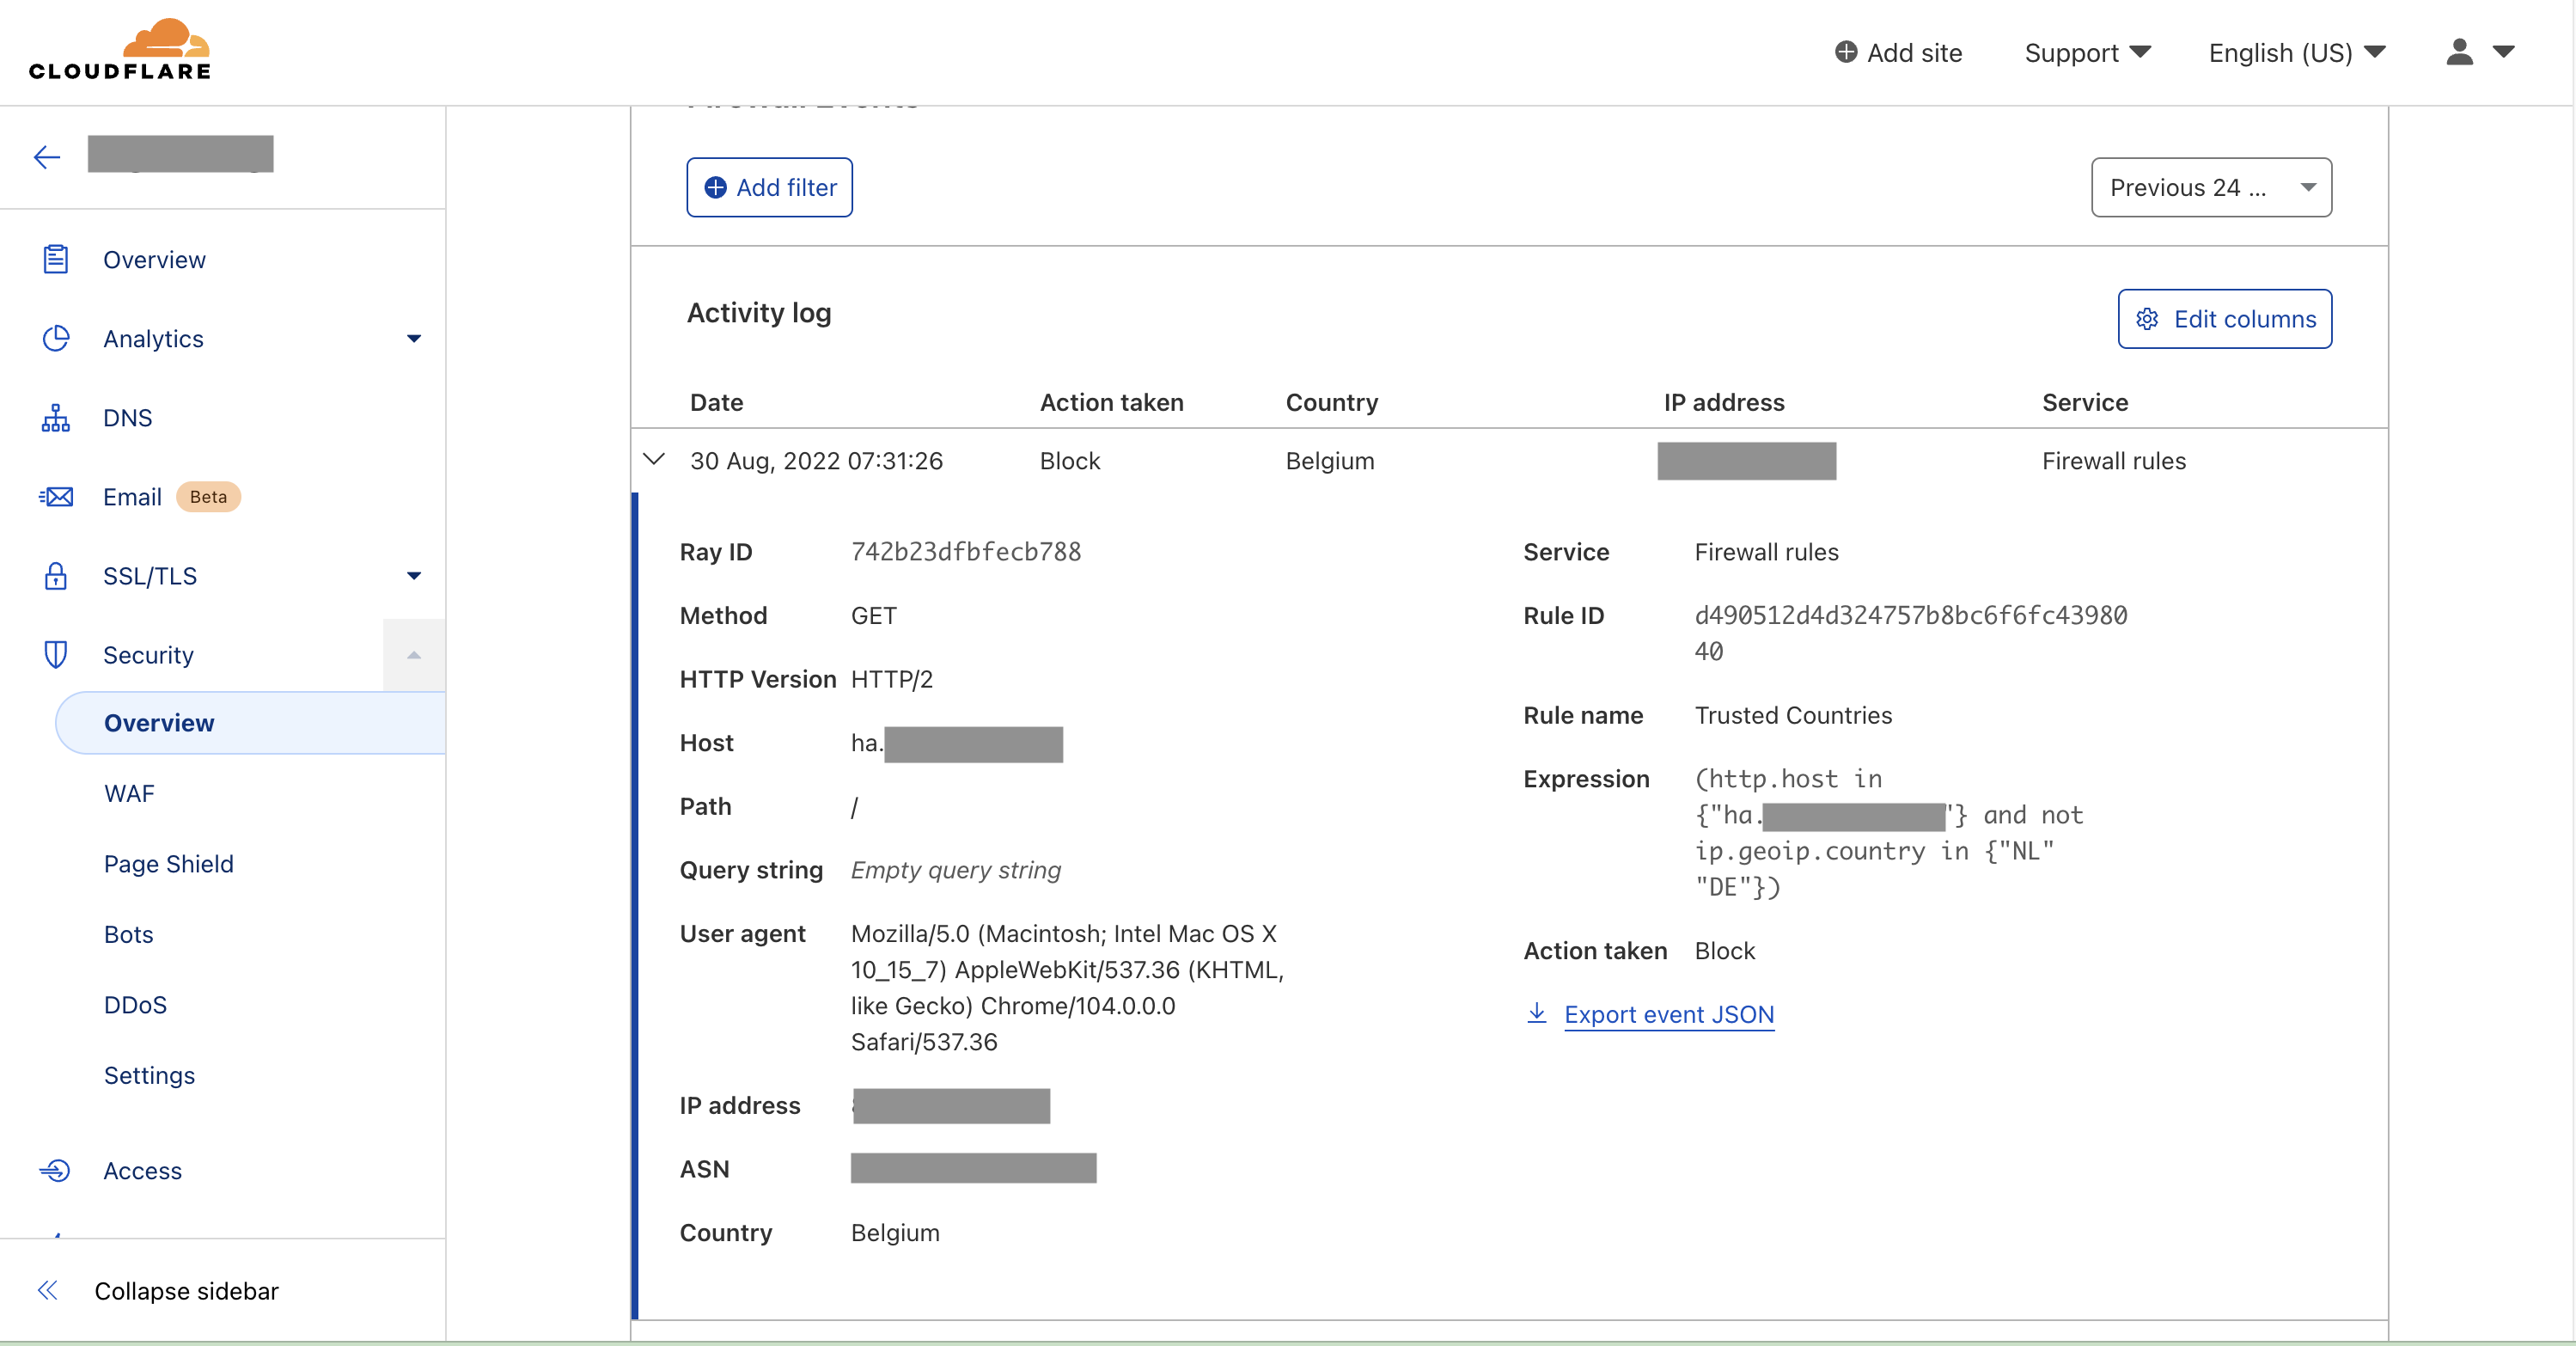
Check the logs in Cloudflare -> Security -> Overview. You should see the Action Taken Block with the rule name and extra details.
Change the firewall rule back to its original configuration and validate the connection.
1
(http.host in {"ha.yourdomain.com"} and not ip.geoip.country in {"NL" "BE"})
Failed logon and notification
Open a new browser tab and connect to your external hostname; for example https://ha.mydomain.com and use a wrong username and password. This should give you a persistent notification in the notification center in the Home Assistant dashboard and a notification on your mobile or other device that you have configured.
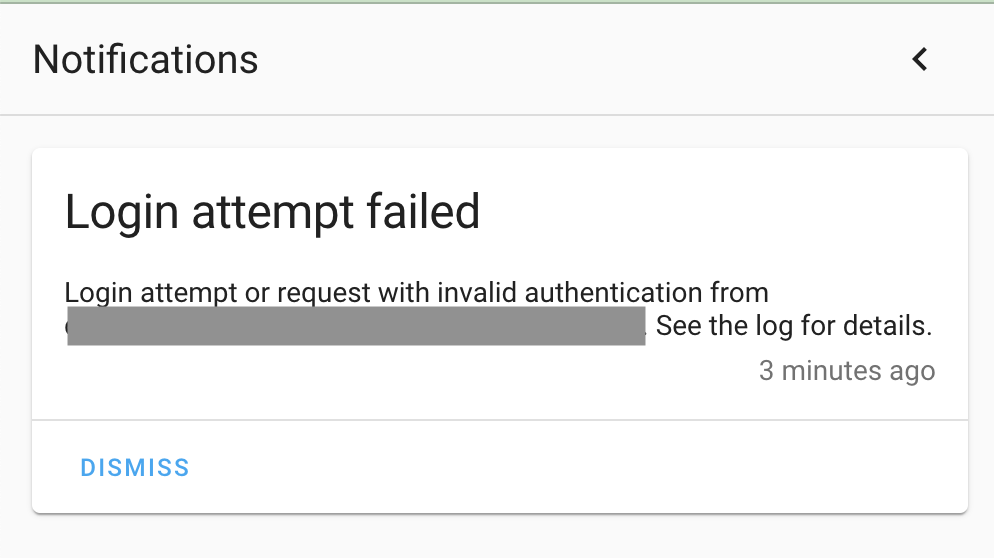
This should give you you client IP address via the x-forwarded-for header and not the IP address of the Cloudflared proxy (Check your IP address on https://ping.eu/)
IP Ban and notification
Open a new browser tab and connect to your external hostname; for example https://ha.mydomain.com and use a wrong username and password for a minimum 5 times. This should give you a persistent notification in the notification center in the Home Assistant dashboard and a notification on your mobile or other device that you have configured.
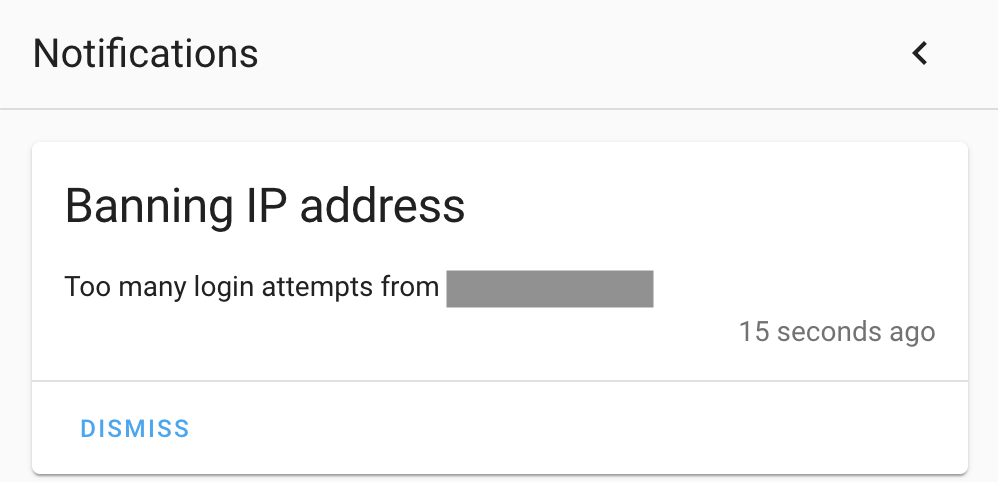
This should give you your client IP address via the x-forwarded-for header and not the IP address of the Cloudflared proxy (Check your IP address on https://ping.eu/)
This will create a new file ip_ban.yaml with the relevant IP address and time of the ban
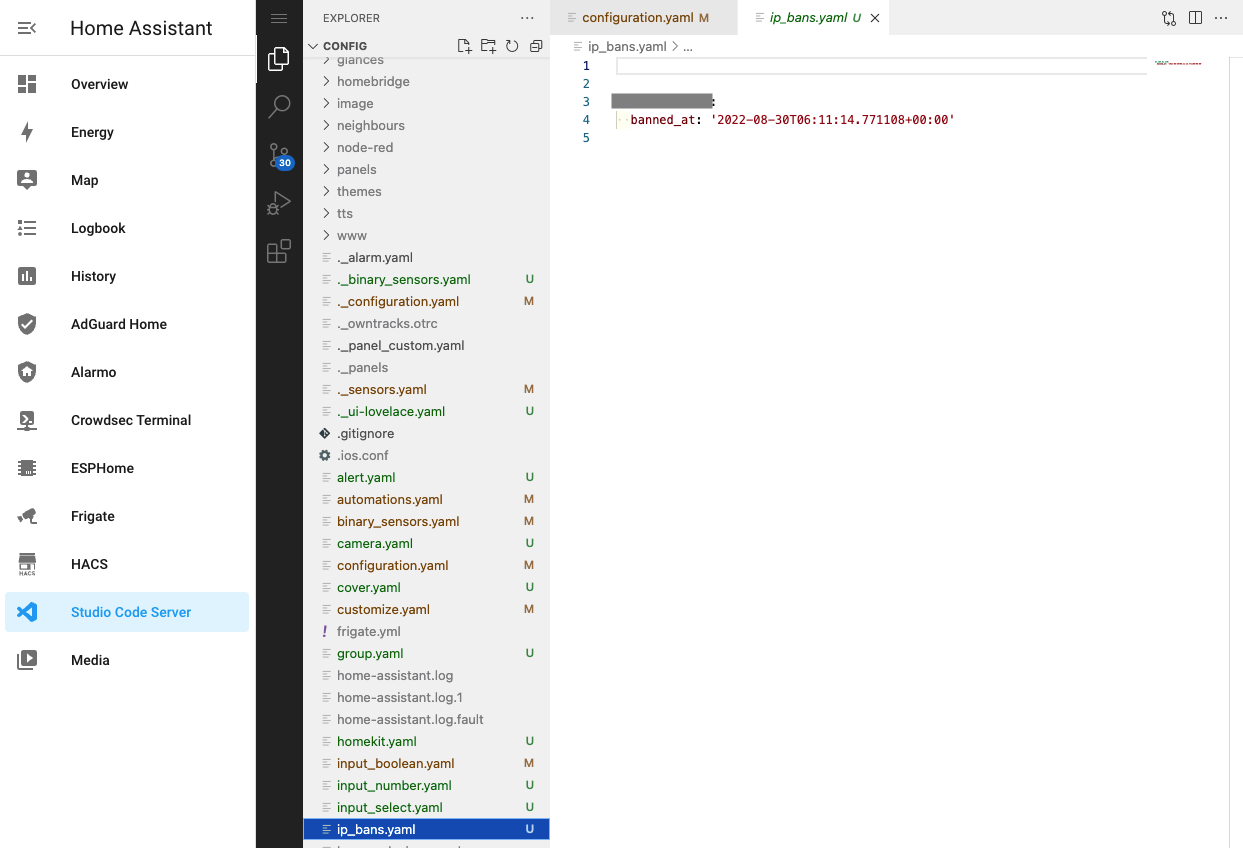
You can remove the complete entry restart Home Assistant to remove the ban
### Deny access from the internet to the /local URI
- Open a new browser tab and connect to your external hostname; for example https://ha.mydomain.com/local
You should receive Access Denied
Check the logs in Cloudflare -> Security -> Overview. You should see Action taken Block with the rule name and extra details 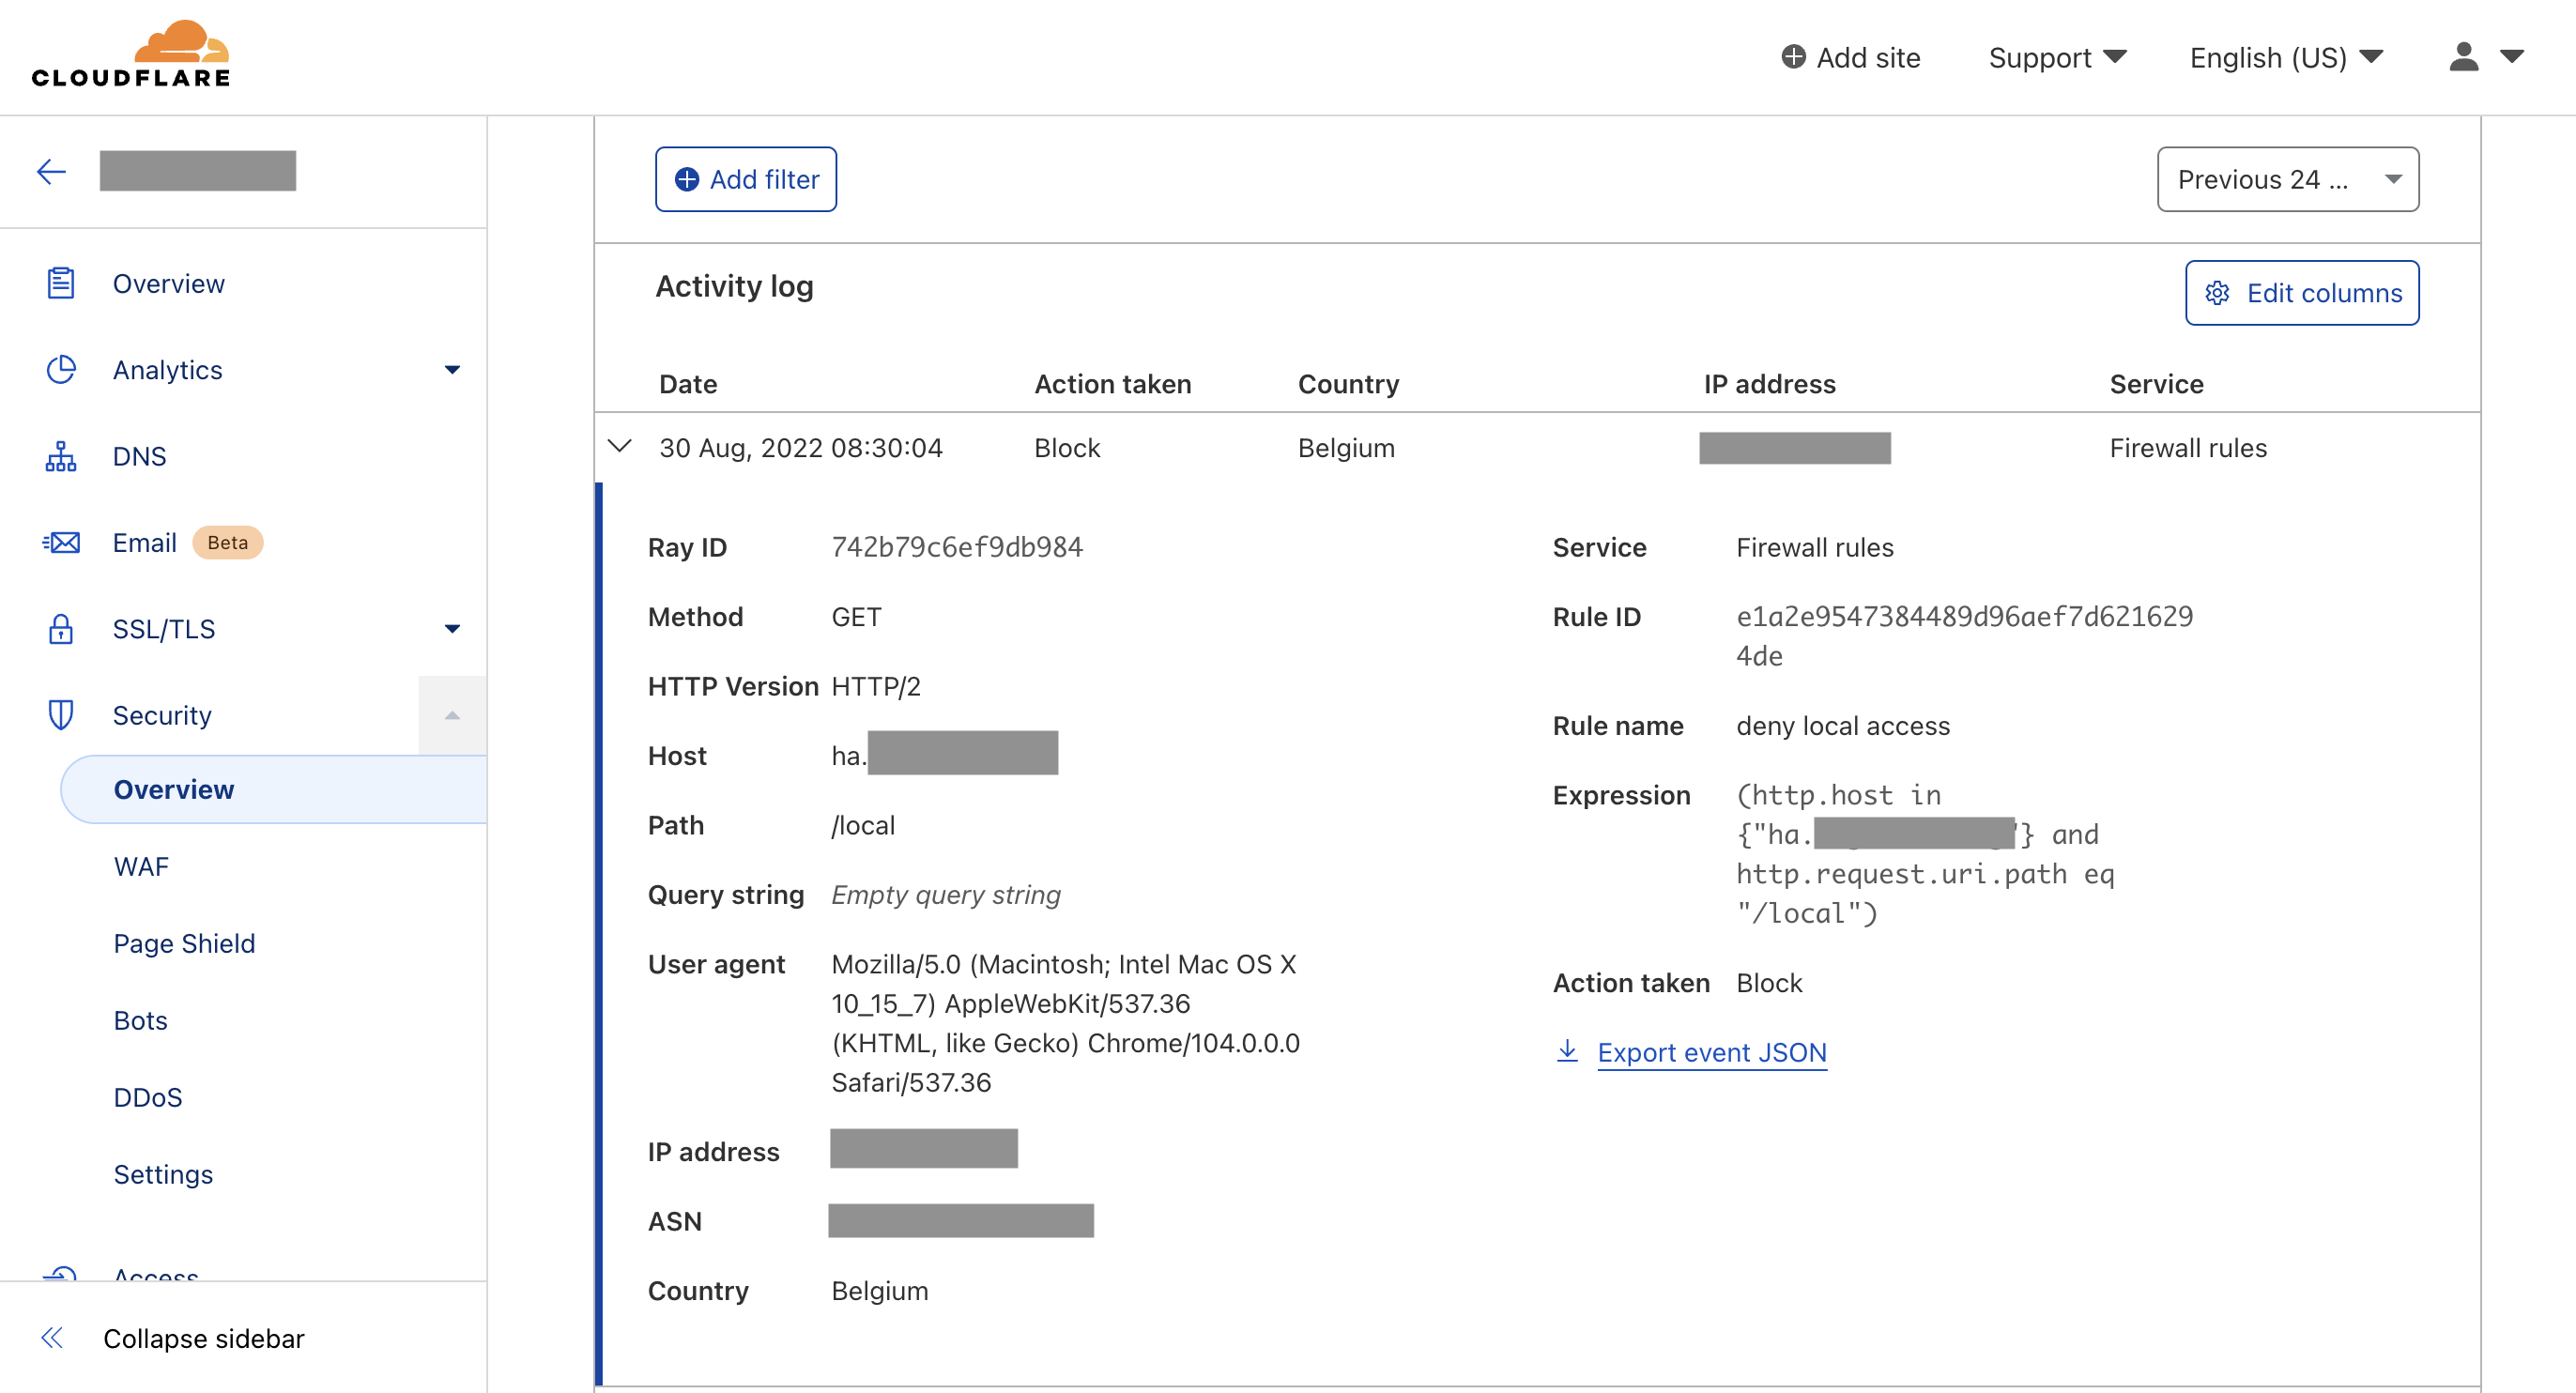
Redirect all HTTP to HTTPS
Open a new browser tab and try to connect to your external hostname with HTTP, for example, http://ha.mydomain.com. This should be redirected to HTTPS
Comments powered by Disqus.